New Ways to View Your Data
Along with Timeline View and Relationship View, there are a number of new views in Timeline 3 that will help you view and understand your data.
Spreadsheet View
Spreadsheet view is a simple table that contains events and their associated information. It allows for quick data entry and editing of events without having to worry about navigating through the timeline.
Narrative View
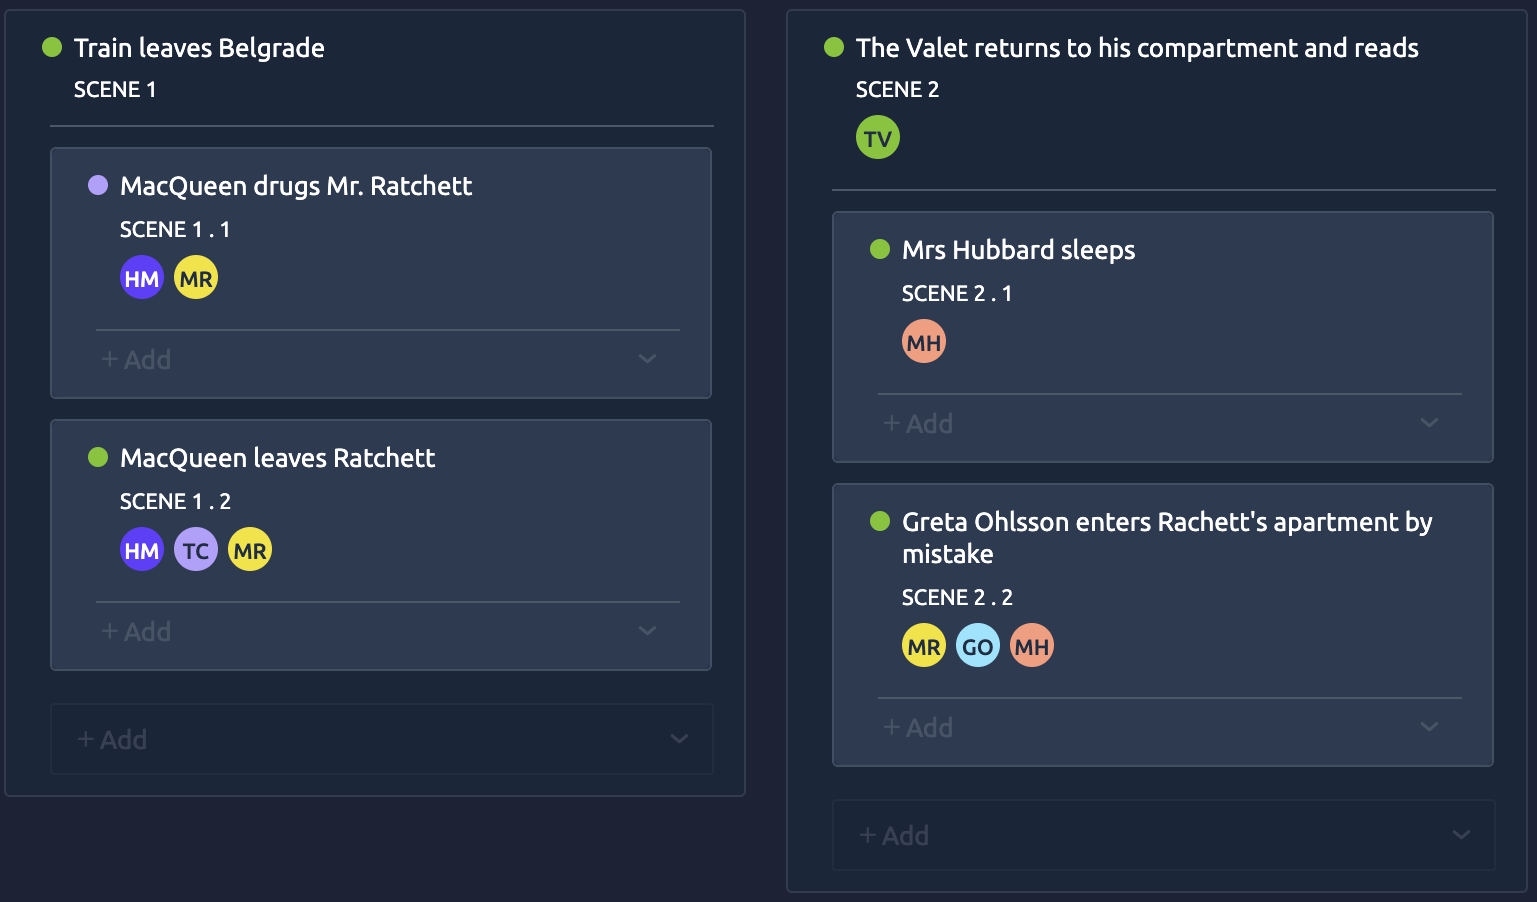
Narrative view allows you order and structure your events independently of their dates. Structure your events into folders such as chapters or scenes and organise your story order. Track your story separate from its chronological order to allow for non-linear storytelling.
See Date/Sequential vs. Narrative Order
Outline View
Outline view gives a simple tree-like table view of your narrative, allowing for quick data entry and editing of your story.
Subway View
Subway view illustrates how events connect with characters, story arcs and other entities across time. You can use it to map out your story or timeline, showing how certain plot threads or character lives intersect.
Mindmap View
Mindmap view allows you to create a free form map showing connections between entities and events. Visually sort your data and their relationships before plotting out your timeline.
Date/Sequential vs. Narrative Order
Timeline 3 contains two different ways of ordering events and other items, date/sequential order and narrative order. Often these will be the same, or you may only need to use one or the other, however for people who are telling non-linear stories it can be helpful to have your events ordered differently.
Date/Sequential Order
Date/Sequential order is a chronological order of your events. This is sorted by the date of an event if it exists, and otherwise by a manual ordering to determine the sequence in which the events occur. It can contain a mixture of events with dates and without, but will always display the order in which the events occur.
Narrative Order
Narrative order is a structured order for events which is independent of their dates. The events are contained in a hierarchical structure with the ability to give labels such as “Part”, “Chapter” and “Scene”.
More Than Just An Order
Date/Sequential and Narrative order are not just different ways to order your events. Events and other items can potentially only exist in just one order, or exist in both. This can be helpful for people who have more events to plot then will eventually appear in the narrative of their story.
The Benefits of Using Two Orders
There are multiple benefits to have two distinct orders for your events.
- Stories that are non-linear, involving flashbacks or time travel will benefit from the ability to view and create both the chronological order of events and the order they occur in the story.
- Further world building can be mapped out on the timeline, such as backstories or contextual world events, without polluting to the narrative of your story.
- Events can appear in your narrative that don’t make sense to chronologically track in the timeline (eg. Dream sequences). Furthermore, not only is it useful in for story writing, but can be used in any context where a narrative describing a situation needs to be formed, for example, planning the narrative of a case to present to a court room from the timeline of evidence, or planning a lecture from a historical timeline.
How the Different Views Use Each Order
Each view in Timeline 3 (excluding the free form MindMap View), uses either Date/Sequential order or Narrative order to display the data.
The views that use Date/Sequential order are: Timeline, Spreadsheet, Relationship and Subway.
The views that use the Narrative order are: Narrative and Outline.
When you add an event to the spreadsheet, timeline, subway or relationship view, it will exist in the date/sequential order. It won’t be added to the narrative until you explicitly do so.
To add an existing event to the narrative, drag it either into the narrative view or the outline view. This will add the event to the narrative order, while keeping it in the sequential order.
Split Views
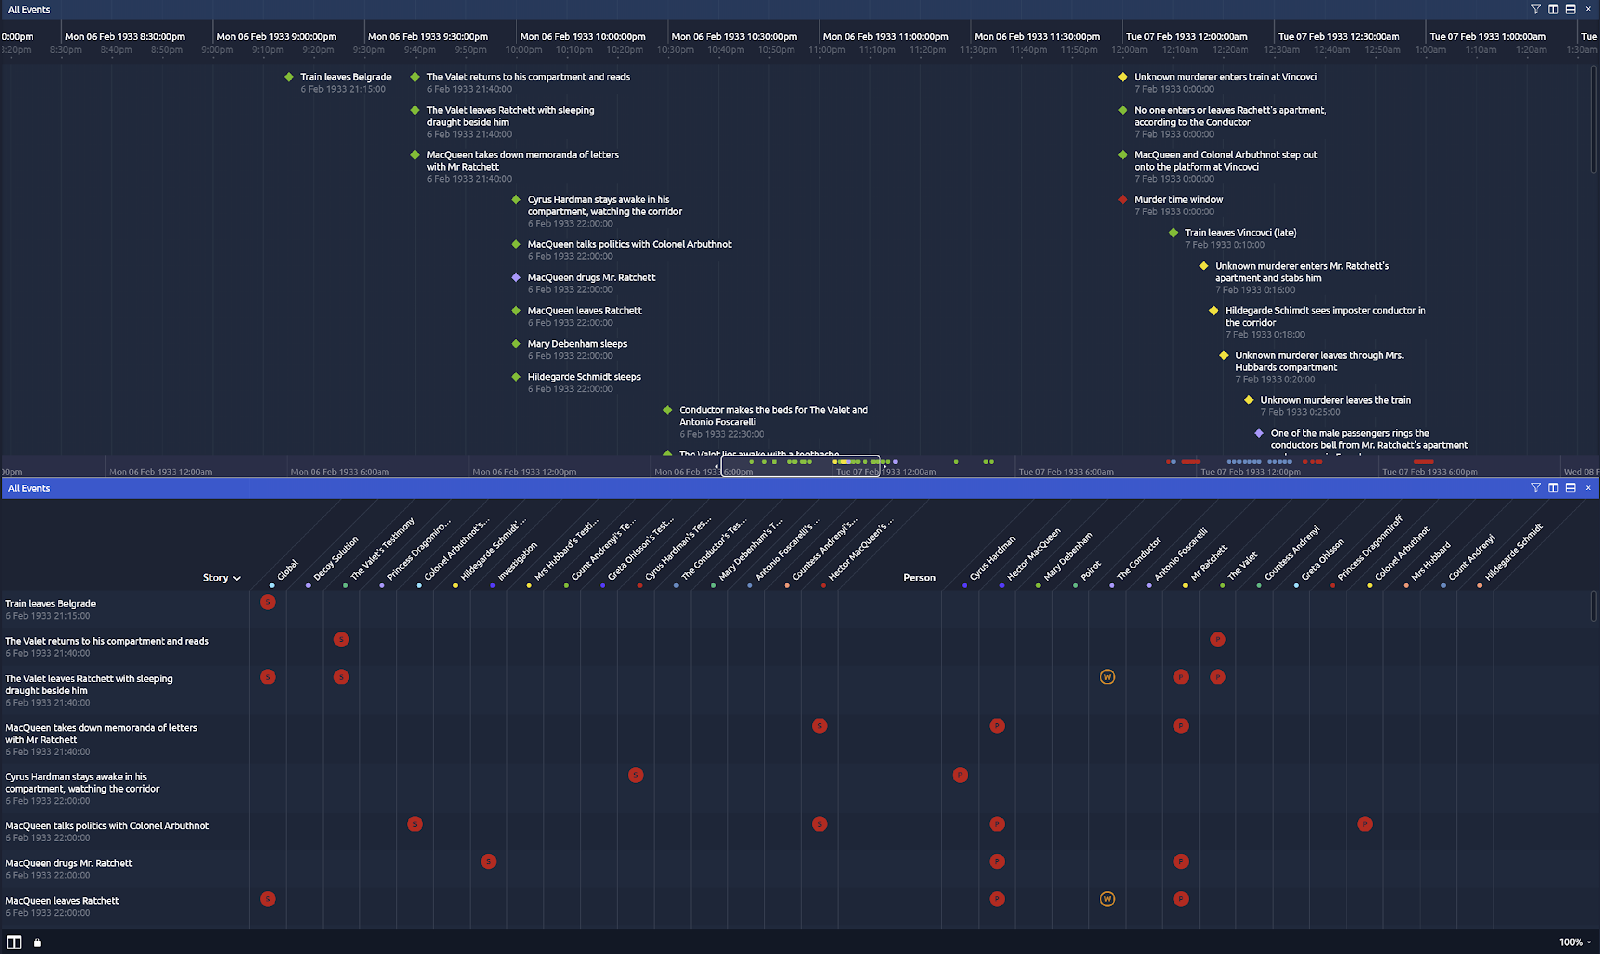
Split your screen into multiple sections to see different data or different views side by side. Drag events between views to easily add events to different view types.
Different Event Types
Events can have different “types” (eg. Epic, Task for Project Management or Flashback, Backstory for Fiction Writing) allowing you to further organise your data.
Improved Entity Functionality
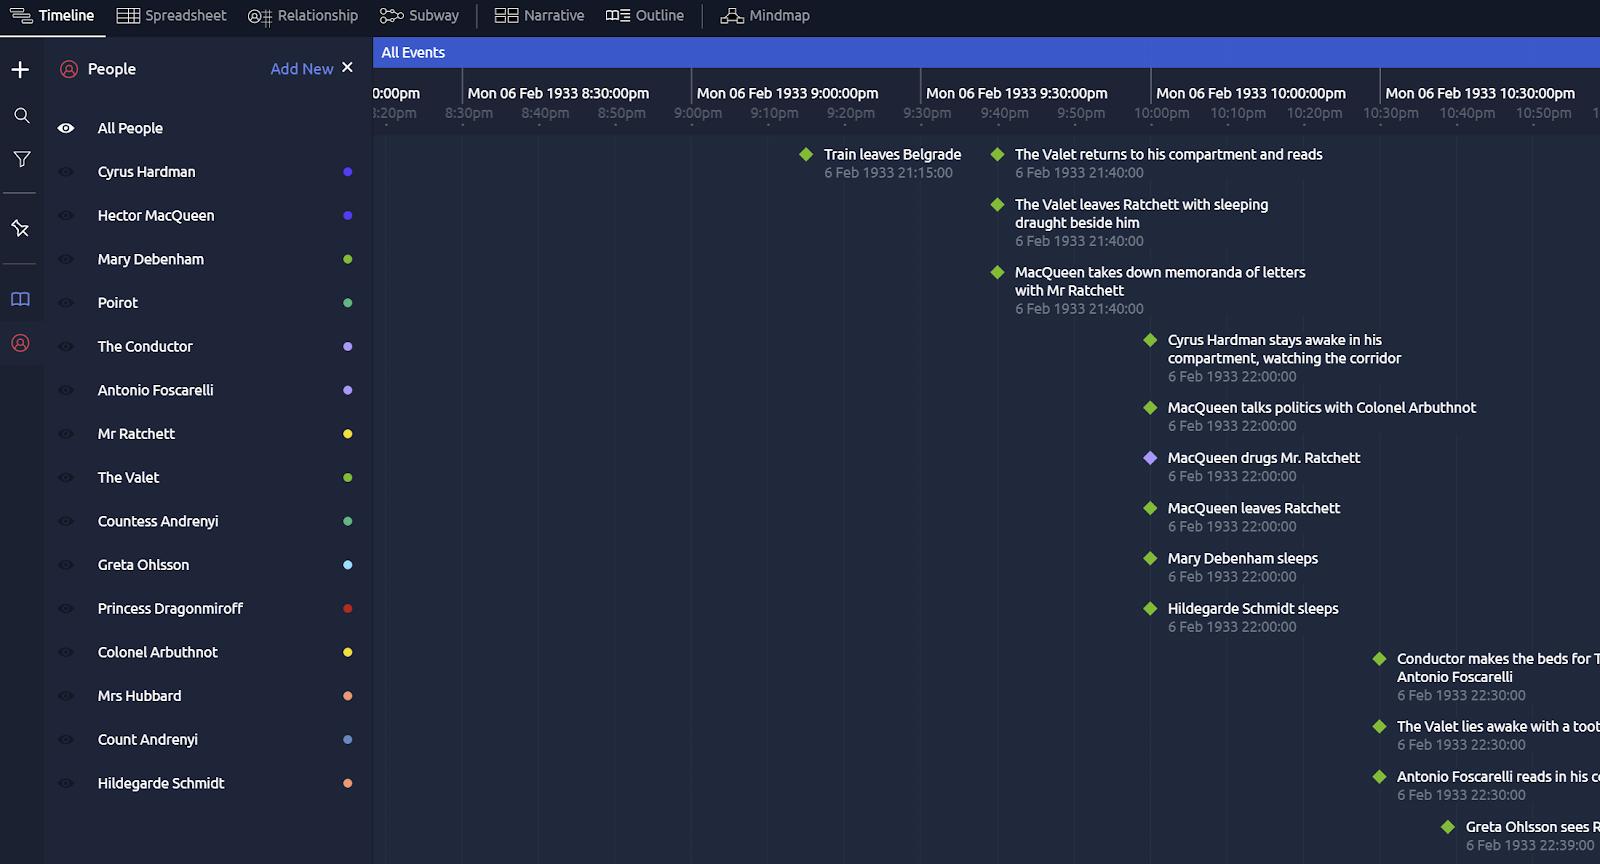
Entities are now more integrated into the overall interface with easily accessible entity lists to provide a quick way to filter events by entities, and to add and delete new ones. They can be displayed on multiple views, including the timeline view if given start and end dates. You can now have relationships between entities as well as events, and add more user defined properties for each entity that can be edited via the inspector panel.
Dependencies and Constraints
Aeon Timeline allows you to setup dependencies and constraints between items on your timeline to ensure that they are scheduled to occur in the correct order or are separated by an appropriate time span.
These options have been expanded in Aeon Timeline version 3 to be both easier to use and more flexible than the system in version 2.
When dependencies or constraints are violated due to an action you perform (e.g. moving an event to a later date), you have the option to auto-resolve the items (e.g. other items will automatically adjust to accommodate this shift), or just show a warning. This is described in a later section.
What are Dependencies
Dependencies are the more straightforward of the pair and will be more commonly used, especially in the Project Management space.
With dependencies, some items are marked as being Blocked by other items, which means that item cannot start until the other items have finished.
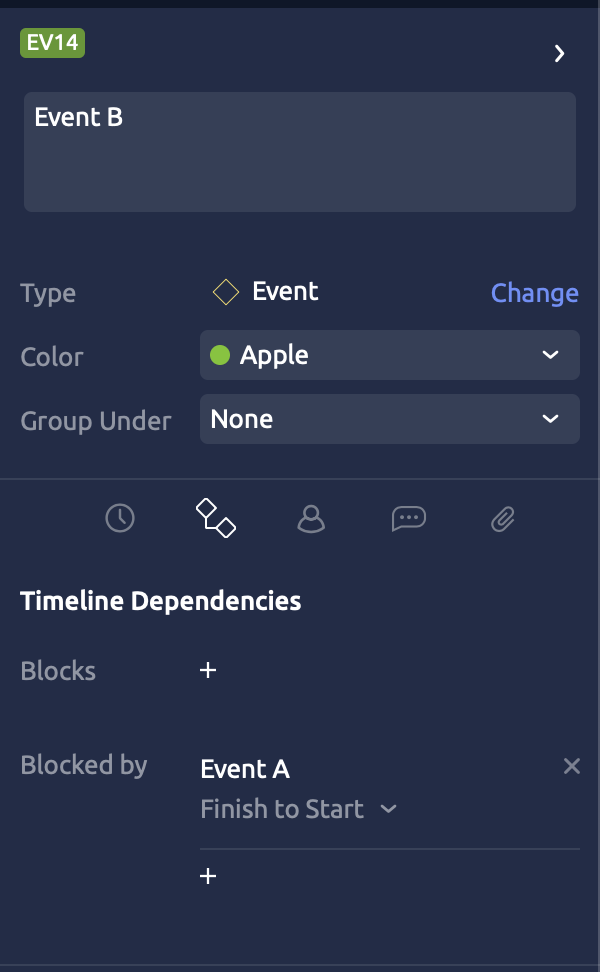
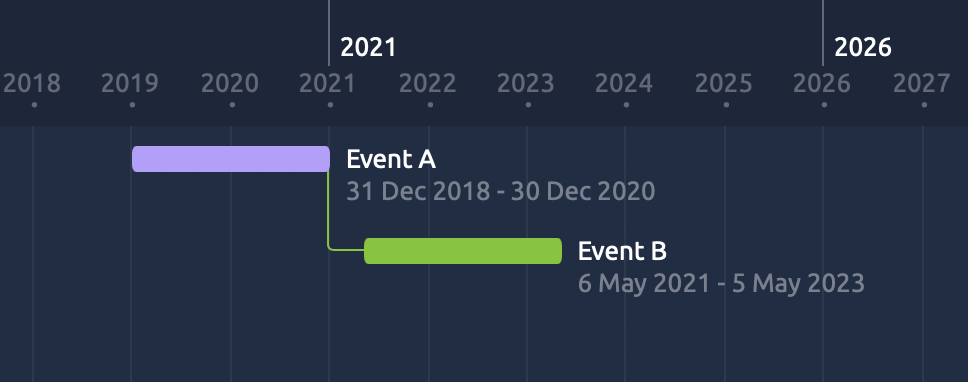
So when we say that Event B is “blocked by” Event A, that means that Event B’s start date must be later than or equal to Event A’s end date.
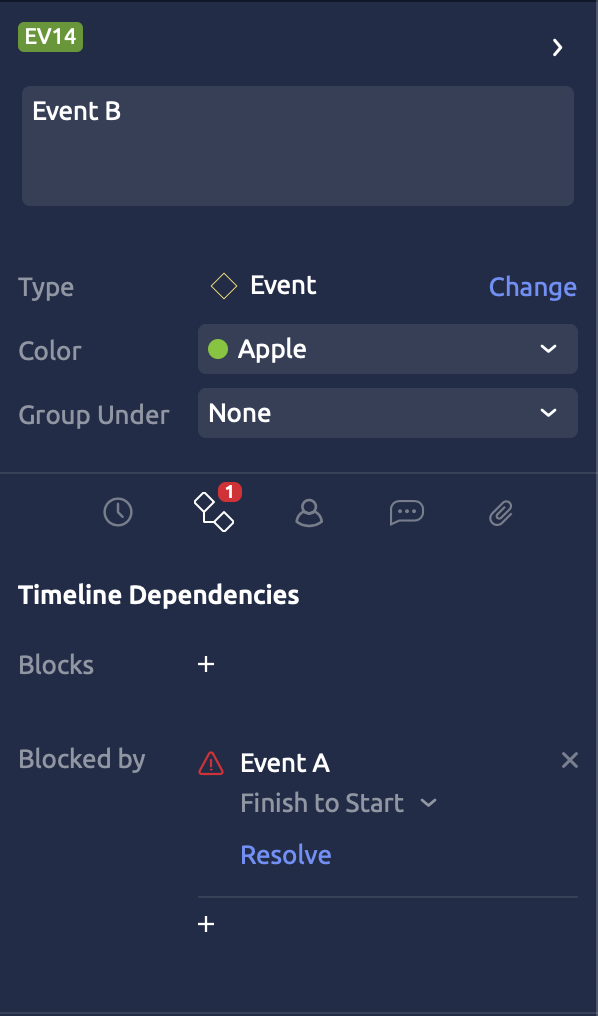
In this situation, we can also say that Event A “blocks” Event B: the one dependency can be expressed either way, and when you look at the Inspector for an item, you will see lists for both “blocks” and “blocked by”.
Dependency links can be shown on the timeline as lines connecting the two items.
Types of Dependencies
Although Finish to Start is the default and most commonly used option, there are actually four different dependency types you can choose.
Using the same example above, where Event B is blocked by Event A, the four dependency types work as follows:
- Finish to Start: Event B’s start date must be later than or equal to Event A’s end date.
- Finish to Finish: Event B’s end date must be later than or equal to Event A’s end date.
- Start to Start: Event B’s start date must be later than or equal to Event A’s start date.
- Start to Finish: Event B’s end date must be later than or equal to Event A’s start date.
Note that with dependencies, the assessment used to determine if they are satisfied is always “later or equal to”. This differs from version 2, where dependencies had to occur on the exact date.
What are Constraints
Constraints are a more flexible but more advanced option that gives the user finer control over the configuration.
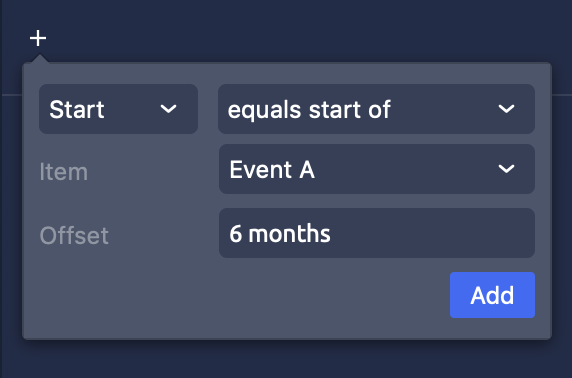
When setting up each constraint, you can choose any combination of the following options:
- Is the item’s start or end date affected
- Should the comparison be against a specific fixed date or relative to another event
- Should the comparison require an exact match (i.e. A = B), or another relational comparison (e.g. A > B, A >= B, A < B, etc.)
- Should an offset be applied (e.g. A > B + 9 months)
This allows you to replicate the constraints used in version 2, which were always A = B + offset, but provides the added flexibility of setting up those other options also.
Violated Dependencies Constraints
A dependency or constraint is violated when its items do not match the criteria configured.
Violated dependencies are shown
You can choose whether you want constraints and dependencies to be automatically resolved, or whether you wish to resolve constraints manually.
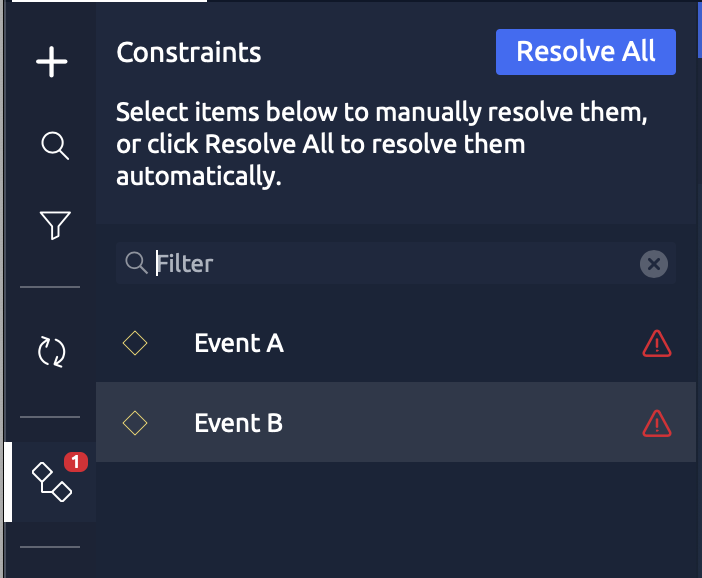
Violations are collated into a dependency panel that can be accessed via the Sidebar, which highlights all of the items with violated dependencies in a single location. The number of violated dependencies is shown in a badge on the sidebar icon.
In addition, violated dependencies are also visible on the timeline, and violated constraints and dependencies can be seen in the item inspector:
Options for Resolving Violations
There are several ways you can resolve violations.
Manual Resolution
One is to simply manually edit the items yourself until the dependencies and constraints are satisfied, or delete any constraints that are impossible to satisfy (such as dependency loops, where A < B and B < A).
Resolve All Button
If you have a lot of violations, you can also use the Resolve All button at the top of the Constraints panel, which will attempt to resolve all violated constraints at once.
This is still a semi-manual process, as you decide exactly when you want to perform the action, and can immediately undo the action if you do not like the result.
Depending on the volume and complexity of the constraints, this may lead to significant changes to items throughout your timeline, so it is better to resolve constraints frequently to ensure you do not have too many changes to work through. There may also be certain constraints that the system cannot resolve and which you will need to resolve manually.
Live Automatic Resolution
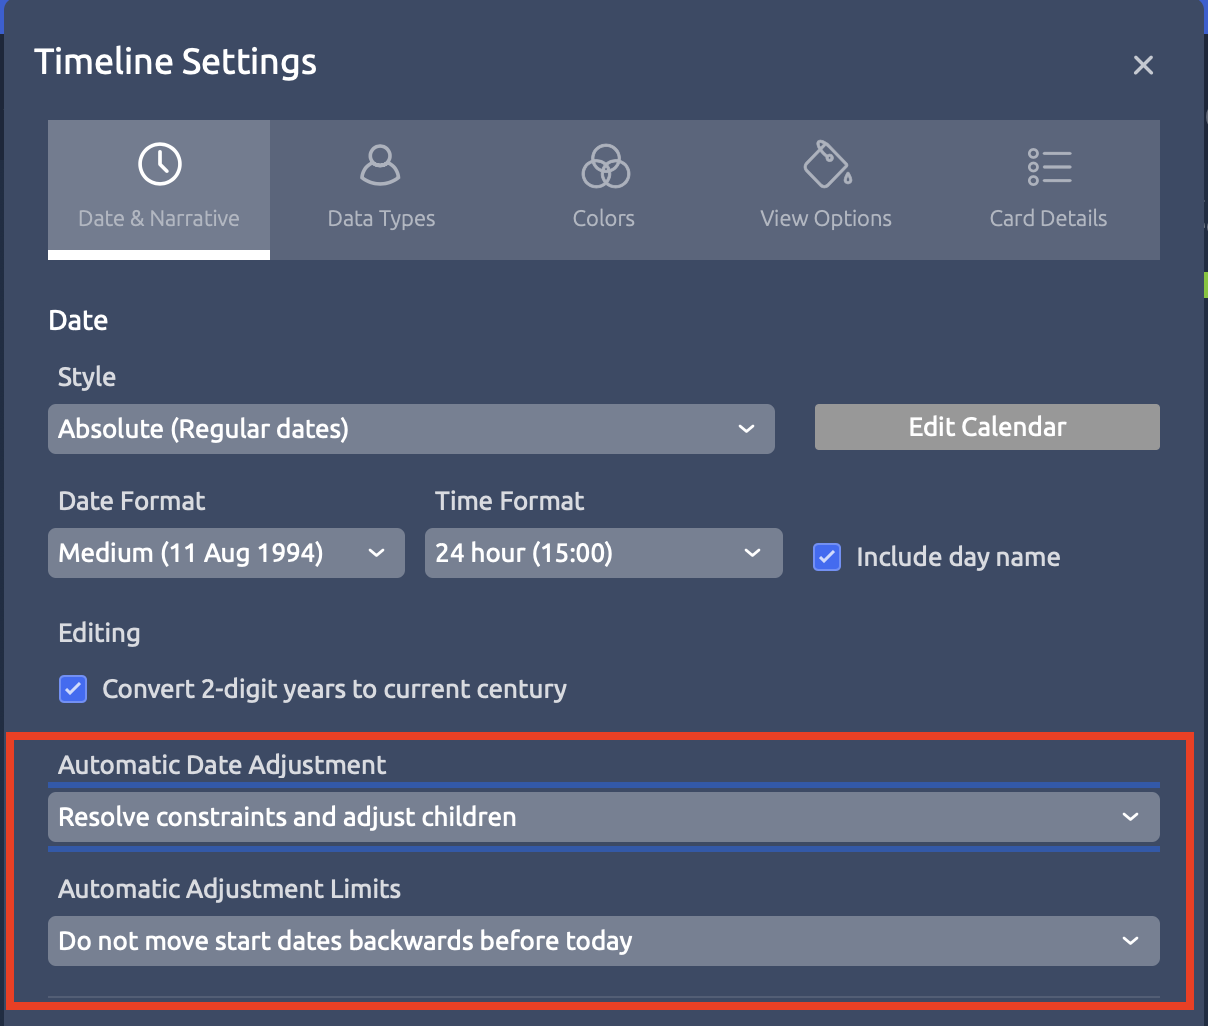
The final option available to you is to turn on live, automatic constraints resolution in the Settings. Depending on the template you use (e.g. Project Management), this option may be turned on by default, but it can always be adjusted in the Settings at any time.
With live, automatic constraint resolution, Aeon Timeline attempts to resolve any constraints created by your actions as soon as they are introduced.
Using the example from above, where Event B is blocked by Event A (i.e. Event B must start after Event A finishes): if Event B is taking longer than you expect, so you add another 6 months to its duration, Event A will have its start date adjusted to occur after Event B’s new end date.
Live automatic updates always tries to retain the change you have made if it can, and instead move other items to satisfy the constraints.
So again, using the example above, if you instead moved Event A forward to start before Event B ends, the system would compensate by moving the start date for Event B backwards in time also.
In real-world situations (as opposed to fictional work), this may not be desired, if it would move Event B’s start date to before the current date. To guard against this, an additional setting is provided that allows you to determine when items are allowed to be moved backwards in time (e.g. not before today, not before next week, not before next month).
Sync with Scrivener
Aeon Timeline allows you to sync your timeline data with your Scrivener writing project. Once you have setup the initial sync, Aeon Timeline will detect changes made in either application, and prompt you to sync those changes across to the other application.
What data can be synced?
Syncing between your timeline and writing projects creates links between items (such as events, characters, etc.) in your timeline and documents/folders in your writing project.
Narrative to Manuscript
The most important syncing takes place between the Manuscript/Draft folder in writing and the Narrative in your timeline. Once syncing is enabled, these two structures will be kept in sync, so every item in your narrative will be reflected by a document in your Manuscript folder, and vice versa.
Every time you add, delete or move an item in either location, Aeon Timeline will prompt you to apply that same change in the other application.
To give several examples, this means you can:
- Plan out the key events of your story in your timeline file, assemble those events into an intended narrative order, and have that structure transferred across to your writing project ready for you to begin writing.
- Break a document into several scenes as you are writing, and have that change automatically reflected in your timeline narrative.
- Re-order problematic scenes in your timeline file, and their order in the writing project will be automatically updated to reflect the new order.
In addition to creating, deleting and moving items, syncing with your narrative can also copy all kinds of metadata across into your file (see Narrative metadata below).
Entity Folders
In addition to syncing your timeline narrative and Manuscript folders, syncing also allows you to nominate additional folders outside the Manuscript folder that can be synced with other item types in your timeline.
This will allow you to create a folder to store your Character profiles or Locations for your story, and have documents in those folders sync with your Character or Location lists in your timeline file. Once synced, every time you add a new Character in either Scrivener or Aeon Timeline, a matching character will be created in the other application.
When syncing with entity folders, only the document title / item label is used (other metadata is not synced), and only top-level documents (i.e. documents immediately nested under the selected folder, but not sub-folders or documents) are considered when syncing.
However, once you choose to sync an entity folder, any relationships between those entities and documents in your narrative are automatically added as keywords to your Scrivener documents.
Narrative Metadata
When syncing your narrative, you are able to choose which additional information you want to keep up to date between the applications.
The following options are available when syncing:
- Timeline label can be synced with the Scrivener title
- Timeline summary can be synced with the Scrivener synopsis
- Timeline color can be synced with:
- Scrivener label (i.e. color)
- Scrivener status
- List-type Scrivener custom metadata fields
- Timeline start date, end date, and duration can be synced with custom metadata fields in Scrivener
- Timeline properties can be synced with matching Scrivener custom metadata fields
- Timeline list-type properties can also be synced with Scrivener label or status
- Timeline tags are automatically synced with Scrivener keywords
- Timeline relationships are automatically synced with Scrivener keywords for any item type that is selected to be synced with a different Scrivener folder
How does syncing in version 3 differ from Version 2?
Syncing in version 3 offers more functionality and is more automated than in version 2.
A few of the key changes are:
- Aeon Timeline will now continuously watch for changes in the writing project and update the sync status to show unresolved changes. This should make it easier to keep things up to date between versions.
- On the Mac, Aeon Timeline can write to a writing project while it is open (although technically it must close and re-open it, but this is at least automated). We are working with the Scrivener team to bring this to Windows too.
- Syncing with the newly added Narrative feature of Aeon Timeline is more automated than the previous manual selection of what to sync
- Syncing with entity folders has been added for the first time, so that you can keep Character and Place lists up to date as well as events.
- Relationships are now synced using Scrivener keywords rather than custom metadata fields, which should make it easier to search and filter in your writing project
- In order to support the narrative syncing, each timeline file can now only be synced with a single writing project.
Important Note: Aeon Timeline version 3 will only sync with Scrivener version 3 (or the Scrivener 3 beta on Windows).
Getting Started with Syncing
The ideal time to start syncing is when you are first starting out with one of the applications:
- For an existing timeline file, you should setup syncing as soon as you create the Scrivener project
- For an existing Scrivener project, you should setup syncing as soon as you create the timeline file
Starting syncing at this point allows you to import any existing data from one application straight into the other and ensures item links are being created and maintained when data is being created, and allows you to avoid the extra step described below.
If you already have an existing Scrivener project and timeline file, and they both already have data, syncing is still possible, but you will need to manually link existing documents and items.
Otherwise, the default behaviour from Aeon Timeline will be to assume that there are new, unrelated items on both sides, and will create duplicate copies of the items (i.e. every Scrivener document will be copied across as a new item in the timeline, and every timeline item will be copied across as a new document in Scrivener).
To configure syncing within Scrivener:
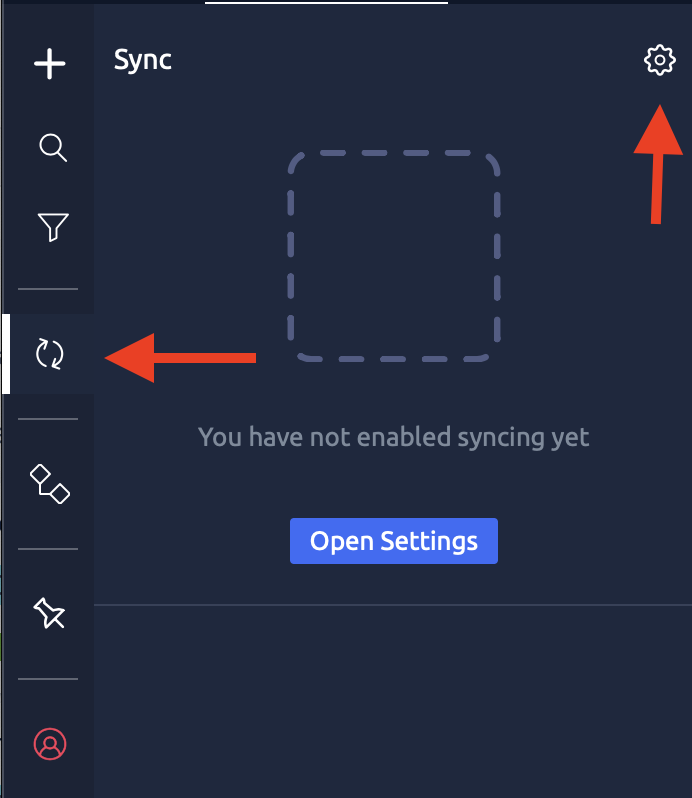
- Click on the Syncing icon in the Sidebar, and in the left-hand panel that opens, click on the Settings button
- Choose Scrivener, click Browse to choose the Scrivener project, and then click Next
- On the next two pages, choose which syncing options you want to enable (see What data can be synced? Above, and click OK.
With syncing configured, the user interface will update to show the current sync status (see following section):
Once your sync is setup, it is a good idea to match any existing items and resolve any conflicts straight away.
To do this:
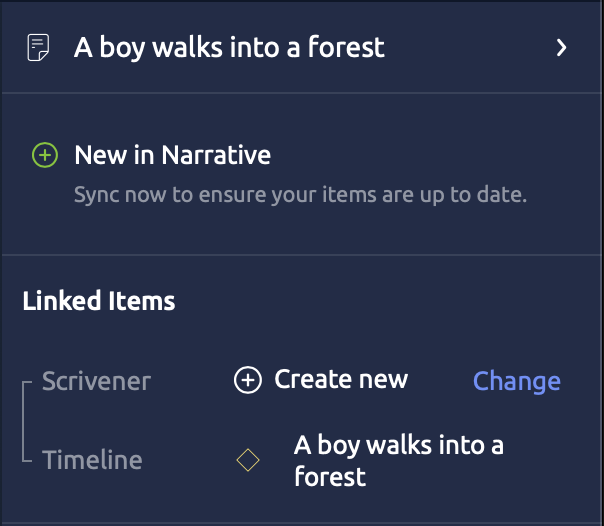
- Click on a new item in the syncing panel (i.e. any green item).
- The sync item inspector will open on the right-hand side of the window, showing that the default behaviour will be to create a new item in the other application.
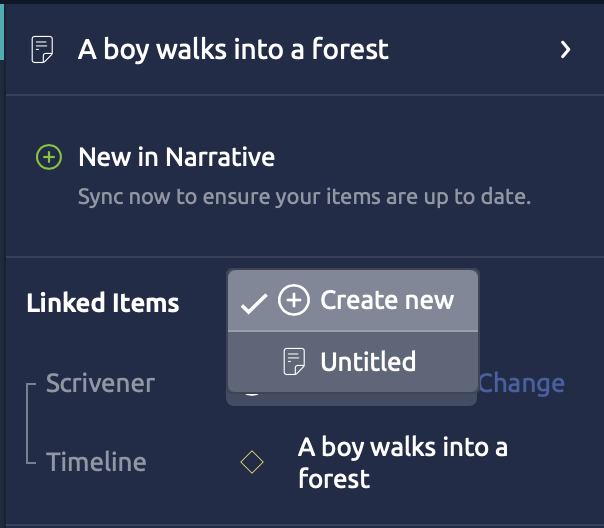
- Click Change, and then choose an already-existing item to link it with
The Sync status will update to show that those items will now be linked:
Once you are happy with your configuration, click Sync Now.
This will apply the first set of changes to the Scrivener project and Timeline file, and allow all subsequent additions, deletions and edits to be tracked from then on.
Every time you go to the Scrivener project and make some changes, Aeon Timeline will identify those changes and update the UI to highlight any un-synced changes that require your attention.
Syncing User Interface
The sync icon in the Sidebar will indicate when there are un-synced changes in either your timeline or Scrivener project.
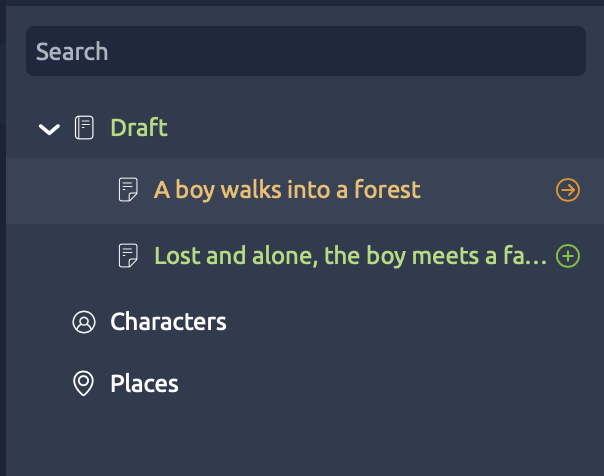
When there are unsynced changes, the tree in the sync panel represents how the Scrivener binder/timeline narrative will look after changes are applied:
- The order of items in the binder will reflect the order they will have after syncing
- Newly created items will be indicated by a green plus icon
- Items with changes will be indicated by an orange exclamation icon
- Deleted items with be indicated by an orange minus icon
- Items with conflicts that require manual resolution will be highlighted by a red exclamation icon.
The labels in the tree above those items will be highlighted in the same color to make the source of changes easier to trace within the tree.
Clicking on any item in the sync panel will show more information about that sync item in the Inspector panel on the right side of the window. In this panel, you can see information on the specific changes that have been detected, and if necessary, choose between conflicting values.
Improved Search Functionality
You can now search through event’s notes, summary and other text fields along with the event label. Search for entities aswell as events, and with the improved interface access results quicker and easier.
Calendar Markers
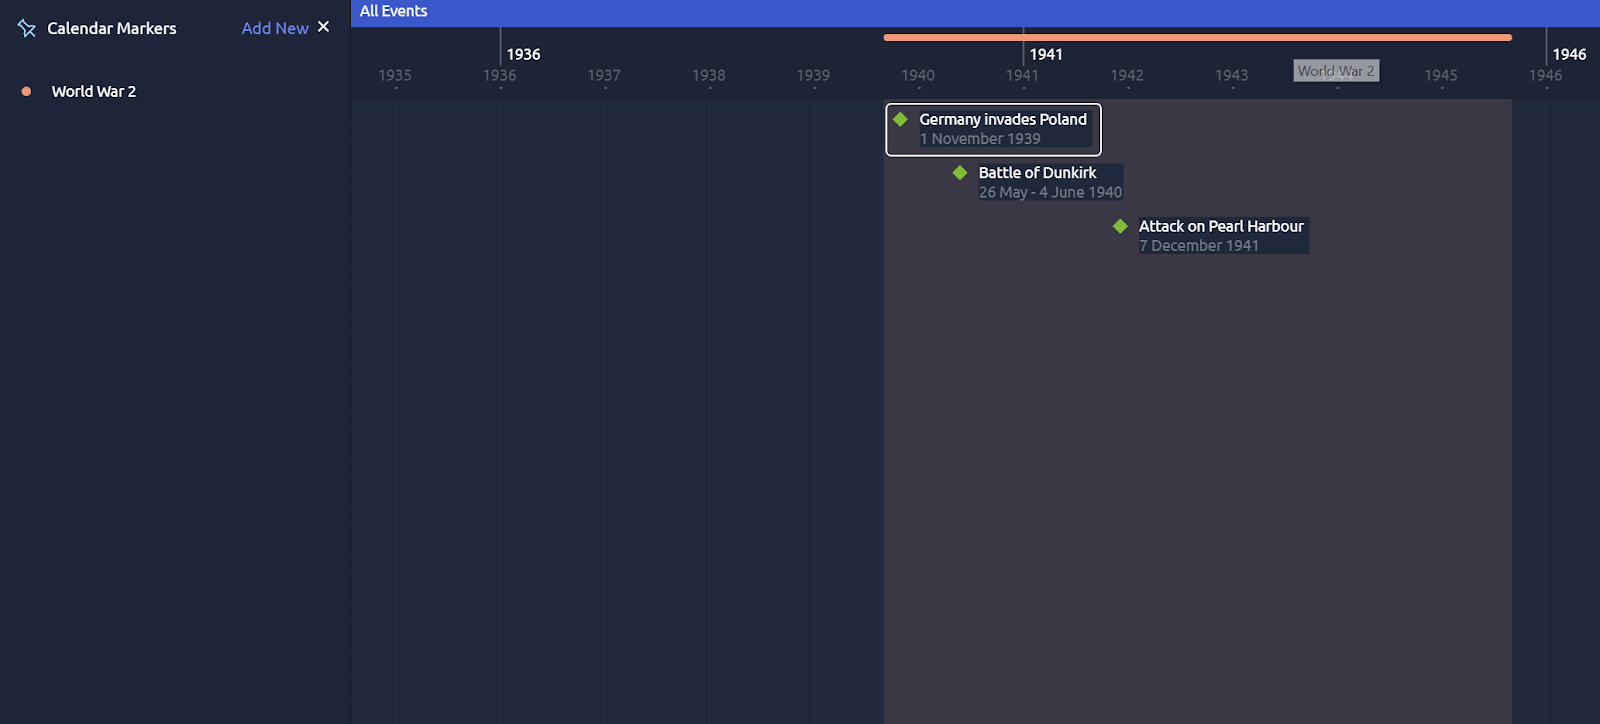
In addition to the “Today” line, you can now add custom defined calendar markers to your timeline. Use them to highlight important dates without needing to create specific events or change the layout of the timeline. Repeat markers at various time intervals to highlight ongoing milestones such as birthdays.
And Many More…
These are the biggest changes that have been added to the application, however many more have been included to help improve the usability of the application. These include:
- More intuitive and easier to use filters.
- A quicker way to add events and their associated information that doesn’t require multiple windows.
- More options for what can be displayed for each event.
- An improved date picker where you can choose the precision level.
- Lock events on the timeline so that they don’t move.
- More templates and a better template wizard to help give you the exact properties you need.
- Event and entity avatars.

